How to Make a 3d Funny Bunny Cake How to Make Ass Cake
Jump to How-To
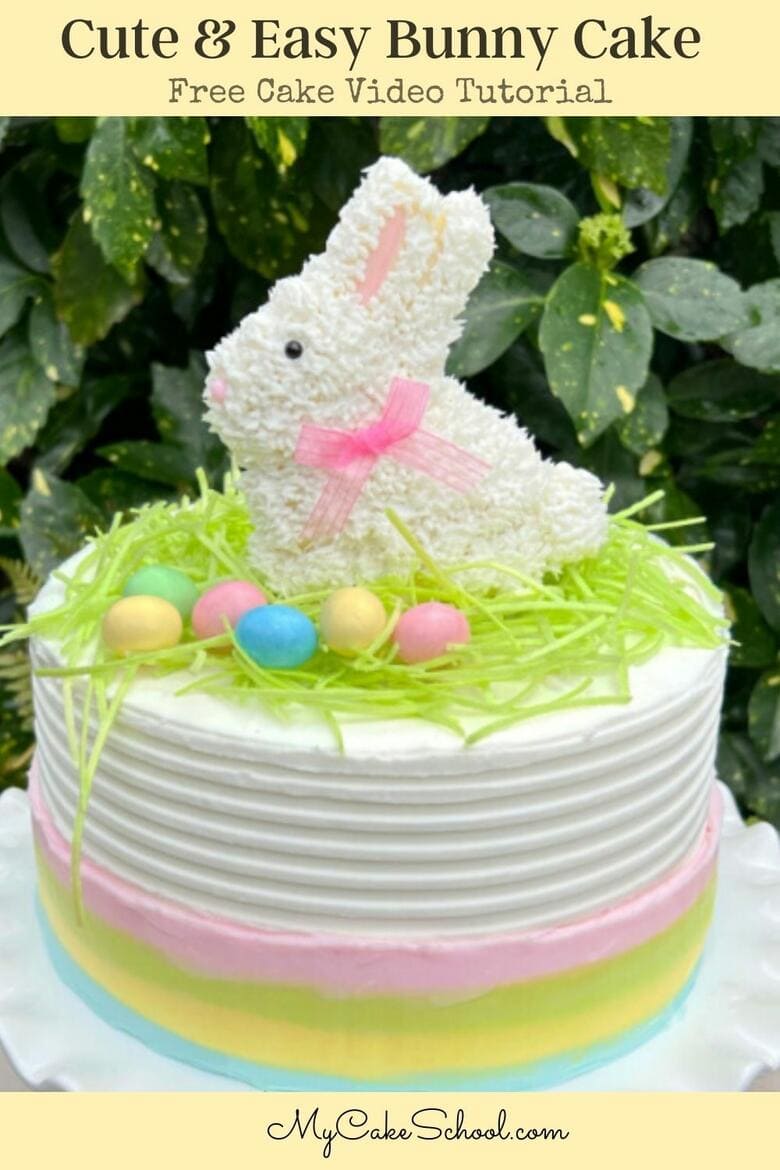
In this quick video tutorial, I'chiliad going to testify you how to make a Cute and easy bunny cake! Keep this cake design in mind for Easter celebrations- it is so much fun to make.
How to Brand an Easy Bunny Cake Topper
The star of our Easter cake is a beautiful little bunny cake topper, which tin can exist created in a matter of minutes!
Chocolate Bunny: To create our bunny, we simply covered a hollow white chocolate bunny with buttercream. I chose a Lindt White Chocolate Bunny considering information technology was simply the right thickness to stand on it's own and wasn't also big.
First, I painted the inside of the bunny's ear pinkish using a combination of pink and white coloring gel and a fleck of everclear (vodka works well also).
Piping: Next, cover the bunny in buttercream using a fur/grass pipage tip 233.
In guild to keep things simple, I didn't apply the buttercream to the lesser section of the bunny and then that I could have something to concord onto. I added the bunny'south fur to that section later on calculation it to the cake.
If yous notice that the bunny is becoming soft from the heat of your hands, just pop it in the freezer for about five minutes to firm things upwards.
If you don't have a piping tip 233, you can utilize a small star tip for a similar upshot, or y'all could even texture the buttercream with a small offset spatula!
Striped, Layered Buttercream
This sweet bunny would be ambrosial as a cake topper no matter how the block is busy, but in the video we demonstrate a striped, layered buttercream technique that is actually fun to create- and I love the look!
After combing our 8 inch cake, I chilled it for x minutes to firm up the buttercream before piping on the stripes of coloring using disposable pipage bags (with the tips snipped away).
Brand sure to build out your colorful buttercream stripes enough that you can easily smooth just the stripes (and not touch the white buttercream) when going back in with a bench scraper a trivial later.
Final Details
Afterwards chilling the decorated cake in the freezer for well-nigh 15 minutes or and then to firm upward the buttercream, I moved the cake from the turntable to a cake pedestal.
(The cake was resting on a block paper-thin which was cut down to slightly smaller than the block tier).
Easter Grass & Sprinkles: I added edible Easter grass to the top of the cake and topped the bunny cake topper. I quickly filled in the bottom half of the bunny with the 233 piping tip and added sprinkles for the eyes and nose. (You could also utilise buttercream or fondant for this).
Eggs: I added a few pastel chocolate eggs to add a scrap more color to the cake.
Bow: After the cake was finished, I decided that our bunny needed a bow! For this optional step, we simply made a bow with ribbon and glued it to the bunny with a dot of buttercream.
More Easter Cakes to Effort!
We've created several Easter and bunny block designs over the years! Some are from our costless block tutorials section and others are from our member section. Here are some of our favorites! You can observe the full listing hither: Favorite Easter and Springtime Cake Designs
Unproblematic Easter Wreath Cake- Gratuitous Blog Photo Tutorial
Kit Kat Easter Handbasket Block– Free Video Tutorial
Cute Bunny Cake- Gratuitous Video Tutorial– Costless Video
Sweet and Simple Bunny Cake- Gratis Video
How to Brand a Saccharide Egg Block- Member Video
Cheers so much for stopping by! If you give our bunny cake a endeavour, we would love for you to leave a comment and photo below!
Materials
- In this video, we busy an 8 inch tier merely our bunny cake topper would be ambrosial on cakes of whatever size.
- Chocolate Bunny- I used a white chocolate Lindt bunny
- Vanilla Buttercream (We used our Classic Vanilla Buttercream Recipe)
- 233 Grass/Fur Piping Tip
- Coloring Gels: We used Americolor Deep Pinkish, Electrical Greenish, Sky Bluish, Lemon Yellow
- Sprinkles for eyes and nose (You could also use buttercream or fondant)
- Edible Easter Grass
- Chocolate Eggs (optional)
- Cake Rummage (optional)
- Demote scraper/straight edge for smoothing
- Disposable Piping Bags
- Vodka/Everclear/Lemon Extract for mixing with coloring gel to create pinkish "paint" for ear. You could also employ pink petal dust of light pink buttercream or fondant for this.
- Ribbon/Bow for bunny- attach with a dot of buttercream
- Cake Cardboard- If decorating the cake on a turntable or kitchen counter, assemble the cake on a cake cardboard cut down to the size of the cake (or slightly smaller) then that you can easily transfer the chilled, busy cake to the pedestal or cake plate.
Instructions
For the Bunny
I first painted the inside of the chocolate bunny's ears using pinkish & white coloring gel mixed with a touch of vodka. (You could besides utilise pink buttercream or pink petal dust or fondant for this.)
Encompass the bunny with buttercream fur using a 233 pipe tip. I held onto the bottom of the bunny every bit I worked, and then I didn't fill up this part with buttercream until after placing it on the block.
For the Cake
I frosted the 8 inch cake tier with a sparse layer of vanilla buttercream and chilled for fifteen minutes in the freezer before adding the second glaze of buttercream. I combed the buttercream frosting and chilled over again before pipe on the colorful stripes with a disposable piping bag (with the tip snipped abroad)
When piping on the stripes, pipe information technology thick enough so that the bench scraper won't touch the white buttercream when smoothing with a demote scraper.
The stripes won't be perfect- they will be a bit irregular- -that is okay!
Add together edible Easter grass to the meridian of the cake (or yous can besides add together buttercream grass with a 233 tip or star tip). Add the bunny to the top, and fill out the remaining bunny fir to the bottom of the bunny.
Add sprinkle eyes and nose (employ buttercream or fondant instead if you'd like)
I also added a small bow to the bunny using a dot of buttercream
Add pastel chocolate eggs.
Source: https://www.mycakeschool.com/blog/cute-and-easy-bunny-cake/
0 Response to "How to Make a 3d Funny Bunny Cake How to Make Ass Cake"
Post a Comment